At nordicway, you can easily set up your domain to work with Office 365 email services.
Important:
This guide is only for customers who have an Office 365 business account with an associated MailExchange or private individuals with Exchange Online add-on at Microsoft. If you have a regular Office 365 with Office solution at Microsoft, you should follow this guide.
Below are the DNS settings you need to configure to make it work:
Verify Domain Ownership
The first step is to verify ownership of your domain with Microsoft. You can do this by creating a TXT record with an "MSxxxxx" ID.
Here's what you need to do:
- Log in to cPanel.
- Go to your Zone Editor (DNS).
- Add a TXT record.
- Enter your domain as the name (do not use "@" as instructed by Microsoft, just enter your domain name).
- Set the value to "MS=msXXXXXXXX" (replace it with your own code provided in your Microsoft control panel).
This should create a record that looks like this:

This step should verify your domain with Microsoft.
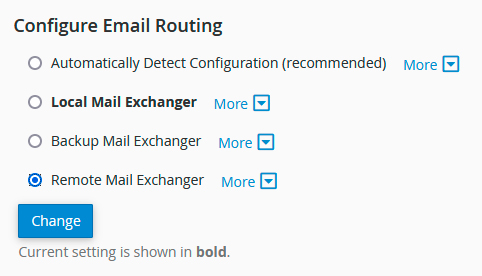
Set Mail Routing
You need to set your mail routing to remote.
Go to "Mail Routing" in cPanel and set it to "Remote Mail Exchanger".
Add/Update Other DNS Records
Now, you need to add several other DNS records, just like you did in step 1. You can find these records by logging into your Microsoft account, where all the values, names, etc., are provided.
MX Records:
You already have an MX record for your domain. Either delete and create a new one or edit the existing one (modify only the destination). Here's an example:

SPF TXT Record:
Modify your existing SPF record as instructed by Microsoft.

CNAME Records:
Create new CNAME records for the following:
-
autodiscover
- Record: autodiscover
- Points to: autodiscover.outlook.com
-
sip
- Record: sip
- Points to: sipdir.online.lync.com
-
lyncdiscover
- Record: lyncdiscover
- Points to: webdir.online.lync.com


SRV Records:
You also need to add SRV records:
-
_sip (_sip._tls)
- Priority: 100
- Weight: 1
- Port: 443
- Target: sipdir.online.lync.com
-
_sipfederationtls (_tcp._sipfederationtls)
- Priority: 100
- Weight: 1
- Port: 5061
- Target: sipfed.online.lync.com

In the same way, create an SRV record for _sipfederationtls._tcp.yourdomain.dk.

Once you have added these records, you should start receiving emails in Office 365 within 24 hours.
If you prefer video instructions, here's an English video tutorial demonstrating the same setup. If you already have an account, you can skip to around 8 minutes into the video for relevant instructions.